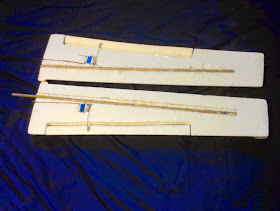
After my utter failure in building a BluBaby RC plane, I decided to hit it again, but with a different approach. I know a decent amount about flight mechanics, but not so much on building one from scratch. So, I used a glider as the base for my plane and added electronics to make remote controlled, and then later a brushless motor. This plane will be Elevator and aileron only, simply because I don't want to deal with a rudder, and its not really necessary in the beginning (yank and bank all the way!)
Surfaces
I started by cutting the surfaces into the wing. I estimated on how big they needed based off of other designs i've seen (mainly on RCGroups). Then I cut holes in the wings for the servos and add the push rods and related hardware.
These are the quick connectors that fit into the servo horn to allow for easy adjustment of the surfaces.
Shot of the elevator system. I'm not sure how well it will work without any bracing on the push rod, but it seems to hold well in testing.
Fuselage
This hole is where all the wires meet and then connect to the receiver. In order to use fewer channels on the receiver, I have used a Y cable to connect the two servos to one channel.
Here's a prototype wheel i'm thinking of 3d printing for a landing gear.
These two red lines show where a 2200mah battery needs to go to properly balance the plane.
Motor Mount
This here was probably one of the hardest parts to design. It has to be sturdy, yet serviceable to change a motor or change the angle of the motor on the mount.
I started with this. The two long bolts act as anchors in the nose of the plane to hold a base for the rest of the motor mount to connect to.
Like so. I used a drill bit to make the holes in the nose.
Basically what it looks like after being hot glued in.
Here the second part of the mount has been connected via the four screws and nylon spacers. I'm really happy with how this part turned out: it is so much better than the one on my blubaby.
Here you can see the four 2mm bolts used to hold the motor to the board. You'll also see that there are washers under some of them. This is to angle the motor to counter act the torque of the motor. Point the motor down and to the right (from cockpit view) to counter act a standard rotating propeller, and down and to the left for a counter rotating propeller.
Wings
As this was originally a glider, it didn't have to support the weight of electronics. As I added these things, I realized there was no way the wings would support all this weight: they needed a spar to rigidize them
Well F*CK. Always wear gloves when using glue...
I cut channels in the foam and added in a spar. One side has a short metal tube that slides into the other to form a pretty solid one piece wing.
Final Build
Here it is all ready for a test flight. It's a bit janky, but should be good enough fro a test flight.


I'm a beginner and i want to say thanks to you because your posts helped me a lot. Cheers, Alex!
ReplyDeleteBrushless RC Plane
Water Hack Burns 2lb of Fat OVERNIGHT
ReplyDeleteWell over 160 thousand men and women are losing weight with a easy and secret "water hack" to burn 1-2 lbs every night as they sleep.
It's very easy and works all the time.
This is how you can do it yourself:
1) Hold a glass and fill it up half glass
2) Proceed to use this weight losing hack
and be 1-2 lbs thinner in the morning!